Monday, February 28, 2011

Paper Strip Sculpture

Some of my lesson plans for preschool are derivative of what I am teaching my kinders.  Kindergarteners were learning paper sculpture techniques last week.  My preschoolers did something similar, but they learned fewer techniques.


We discussed again what sculpture was, and we sang our sculpture song.  (I'll try to remember to do a post on the song soon.) 


I showed them how the paper strips had trouble standing up on just the tiny edge of the paper.  Then I showed them how we could fold "feet" on the ends and that would support the strips. 


They worked on their own and discovered that they could make circles, arches, and bumpy lines.  Many called their pieces "playgrounds" or "parks."  Some just played with the shapes and did not name them.  It will be interesting to see how the build on what they learn when they are in kindergarten.  I am also interested to see if they will use their imaginations to create new worlds as they age, instead of just making paper shapes.

Wednesday, February 23, 2011

Kinder Architecture

This is an introductory lesson on architecture.  I talked to the kiddos about the job of architect.  We then looked at different kinds of housing.  I showed slides of single family homes, town houses, and apartments.  The children identified many details that they saw on a home including types of windows and doors.  They also pointed out the the smaller details such as mailboxes, shutters, house numbers, and building materials.


With Sharpies, they drew the shape of their houses and rooves.  Then they drew the details.  After the buildings were finished, they drew the things you might find in the landscape.  Finally, they painted the buildings with block tempera.

Sunday, February 20, 2011

Nature Prints in Clay

Here's another blog post from the Artful Parent that has so many possibilities for preschool art classes.  I may try this with just regular clay. 

Thursday, February 17, 2011

Preschool Clay Inspiration

I mentioned to someone this week, if it is "about the process and not the product, why do I have to grade the product?"  At least I don't have to grade kids in preschool and kindergarten yet.

Though I do strive to make the process the most important part of a preschool lesson, I am thrilled when the product is aesthetically pleasing.  It is a big bonus.

Here is a clay piece I found at the Artful Parent  blog.  I may have to develop a lesson similar to this for my itty bitties.

Wednesday, February 16, 2011

Aboriginal Bark Painting

Here's one I have never seen before.  Its from a blog in Australia.  Here's the link to this lesson:  Aussie Art Blog - Art for Kids  The lesson was written for kindergarten but I will spin it for preschool. 

Monday, February 14, 2011

Straw Sculpture

This is from the blog:  Little Preschool on the Prairie.

Valentine Card for Itties

Hmmm....This might have been more helpful about a week ago. 

Needed:  Red paper......"fancy" edged scissors....glue.....colored paper (I like the shiny paper for this.) (And looking at the sample photo below, it was taken before I had the kids try the fancy scissors...oh well.)


Here's what my preschoolers made last week.  I cut red paper into 6" x 12" strips.  After folding them in half, I used the cutting press thingy to cut heart shapes inside.  Any shape could have been used as an opening with another theme greeting card.

I demonstrated how to use the "fancy scissors" that cut the unusual edges and then reminded the kids how we glue paper.  ("Just a dot....not a lot.") 

They had fun cutting with the new scissors and then glued the funky shapes on the solid half of the paper.  When the paper is folded back together, the heart shape shows through.

Sunday, February 13, 2011

Kindergarten Block Collage

This is a lesson for wee ones where they make individual wood block collages.  When the work from this lesson is placed together as a group, it is quite beautiful.


The lesson can be found here: Kindergarten Block Collage

It is from the Beverly Cleary School in Portland.

Saturday, February 5, 2011

Color Robot (kids song about colors)

.
P.S.  Thanks BeccaRuth and Barbara for being the first two followers of my new blog.

Wednesday, February 2, 2011

Chinese New Year Dragon Hats

My preschoolers and kindergarteners watched a portion of a video about Chinese New Year.  I told them how in the olden days, the Chinese people believed that at the new year, bad spirits tried to come into town and stay for the new year.  In order to scare the bad spirits away, people would shoot fireworks; bang pots and pans; and beat drums to scare the spirits away.  Today, in their celebrations, the evil spirits take the shape of a dragon.  One long dragon costume is worn by many people.


The one video that I love the most is an old VCR video from my school library.  Here's a link to the video at Amazon:  http://www.amazon.com/Holidays-Children-Chinese-New-Year/dp/6303314910

There are some decent videos on the web too, though I haven't seen a lot for children.
This is a good one just for some general information for you:

These are some you might want to show your itty bitties:


After my students had the introduction to Chinese New Year, I demonstrated how to make their hats.  Now, before the children arrived, I had cut 18"x24" paper into 9"x24" strips.  I chose red today, but you certainly can use any color you like.  I also had staped the strips into cylinders.  These fit the heads of 90% of the students.  10% of the students had to have theirs unstapled to enlarge or decrease in size.


With my kindergarteners, I reminded them how to fold and cut paper into symmetrical shapes.  We did this with the eyes, nose and mouth.  With the preschoolers, I had piles of precut shapes of paper.  They used simple squares, circles, and triangles, and were able to cut them or use them "as is."

After the children finished the dragon faces, I let them get tissue streamers, three at a time.  After they glued these on, they were allowed to come back and get three more.  I allowed this as long as I had streamers available.  

My preschool classes this year run 30 minutes long.  We used every single minute to make these.  I would like to have had more time so that we could have had a dragon parade. 

Fabric Design in Preschool


Wouldn't it be fun to get together with your friends once a week and spend an hour singing, dancing, and just being creative together? I'm in envy! Here, the preschoolers are designing their own look for winter coats.

Elementary Stitchery

A few weeks ago, several folks asked me for more information about teaching stitchery to kids. Finally I am getting around to posting that information.


This photo is of my granddaughter when she was four and a half. She is stitching a little foam purse that I bought at the craft store. It has pre-punched holes and you just stitch from hole to hole. She was fully engaged doing this.

At school the kids use burlap and the fat plastic needles. Normally we tape the edges of the burlap so they do not unravel. You can see in the pieces that are not taped what a mess the edges become.

I'm still experimenting with teaching preschool stitchery. Usually I give them a small piece of burlap and let them experiment with the running stitch. If anyone has any suggestions for preschool stitchery, please pass them along!


Kindergarten stitchery involves the running stitch and following a line. If I had a 5 year old alone, I'd teach threading and knotting. Teaching these en masse was a slow trudge with frustration and tears. (After a few of those experiences I got my fifth graders to thread and knot hundreds of needles in preparation for kindergarten.) The students draw on the cloth and use a running stitch around the sides of the cloth and the outline of their drawing. The year they were studying insects, I had kids trace a butterfly shape. They were observing the hatching of chicks the year they drew and stitched chicks.

First graders are studying plants during stitchery time, so they draw and stitch flowers. First graders try to perfect the running stitch and add on the threaded and double threaded running stitch. Sometimes I have them color their designs with non-toxic markers.

Second graders study animals during stitchery time. They continue with the running stitch and its variations plus add the couching stitch.

I do not have images of third grade stitchery, as usually I have them weaving. When we do have time for stitchery, they learn the running stitch, couching stitch, cross stitch, satin stitch. They can often master any other stitch I introduce to them.


Fourth grade students paint designs on their burlap with tempera paint. I prefer the liquid tempera, but we have used block tempera as well. I haven't tried watercolor, but I would guess it would be fine. I have lots of samples of stitches out for this age, and they are game to try any of them. These are the most used: running stitch and threaded running stitch, cross stitch and double cross stitch, couching stitch, chain stitch, french knot, satin stitch, and back stitch.

Once the kids get the painted (or drawn ) images on the cloth, they are motivated to stitch for hours on end.

I love teaching elementary stitchery. They seem to find great satisfaction in using their hands and creativity in a way they are not used to.


preschool art

Reggio Emilia Lesson


From what I gather, Reggio Emilia style teaching seems to be about children exploring and experimenting with things that interest them. Adults provide materials, media, and general direction as needed, but the children take the ideas where they want.

Since what I know about Reggio Emilia has been through reading on my own, Camp Creek Blog has been a godsend. The blogger, Lori, explains many aspects of Reggio Emilia style of teaching and offers up help. My preschool lesson this week was my interpretation of an idea she presented.

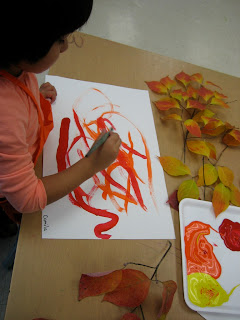
When my preschoolers came in this week, I gave them no specific instruction. There were branches full of brightly colored leaves, paint palettes, brushes and paper on the tables. The children were directed to the tables and told that they could use the supplies as they wanted.

Most children started by experimenting with the brushstrokes they have used before. As soon as they started using their second colors, many expressed excitedly that the colors were changing to new ones.


Some worked on filling up the paper.


This child observed the leaves and was inspired to paint a tree.


This little girl tentatively decided to paint on a leaf.


As other children caught on, they began painting leaves as well. Some began printing them.


This child printed her leaf on the painted tree branches.


Children were excited to discover seeds on the branches.


They were intently focused as they began painting entire branches.


I was fascinated at how cooperatively they worked together. Many of the students in this class speak English minimally, and my guess is that at least 80% of them speak a different language at home.


Since art is a language unto itself, the children could understand what each other was doing without understanding each other's words.


Their classroom teacher was fascinated with how intently the children were working on this lesson. Excitedly, she said that she was going to expand on the exploration with paint and branches in her classroom.

During this lesson, the children experimented with color mixing, printmaking, mark making and working three dimensionally. They explored leaf colors; tree seeds; and how branches, seeds and leaves are connected together. So, through the experience the children integrated art and science.

Debriefing at the end of the lesson is difficult with this group because of time constraints ( it is a 30 minute class) and language barriers. Once clean up begins the focus disapates away from the experience and the moment seems lost. I'm not sure how to tie up the lesson after this. Do I need to tie things up as a group or is talking individually to the children as they are working the same thing?

Preschool Clay

Fridays are interminable. I have five different grades with five different media. The preparation and clean up for all of that is exhausting. Yesterday I had kids printing, glazing pottery, working with clay, drawing, and weaving. I remember sitting for only short periods of time, and spending lots of time hunched over the sink, washing. Last night my brain was numb and my back was tired. Most of the rest of the week, my schedule is good, and I am happy with it. Fridays are just tough.

Enough kavetching.

When I last saw my preschoolers they spent their time exploring with clay. I talked a little about clay, but mostly they played. They pinched it, smashed it, rolled it, and built with it. The idea was to get familiar with it a bit. Most kids played abstractly with the clay but there were a couple of representational pieces. When they were done, the clay went back in the clay bag with the promise that in the next class they would make something they could later keep.

Yesterday they made "elbow pots."
To make these, they pressed their elbows in the middle of a big ball of clay. Some little ones had trouble pressing hard enough into the clay, so we had to help them push. They then took texture stamps and pressed them into the clay to create designs.

These were pretty thick, so I might need an extra week to let the pots dry before firing them. After that I will let the kids glaze.

I think that these look better than the pinch pots the kindergarten and first grade make. Pinch pots are the starting points for a lot of other clay pieces though, so I will continue to teach that.